Nginx是最常用的代理软件,也是最常用的WebServer,怎样很方便地在openshift上部署呢?同时又能很方便地对它自定义进行配置?
直接使用docker的nginx会有以下问题:
- 启动时权限问题。默认openshift的应用会使用类似10000100的user_id启用docker,但是官方nginx镜像会使用root启用;还有nginx默认会启用80端口这个也是需要root权限的。
- 无法动态更新nginx配置。nginx配置在镜像中设置,如果需要更新配置的话,需要重新编译镜像。
- 应用代码更新。如果用户的代码,如静态代码,版本更新,是否可以不更新镜像,而完成版本的升级?
在Openshift上部署一个nginx应用如何解决以上3个问题。
- 权限问题
解决办法: 制作专用nginx镜像,1. 更改特殊文件夹的权限为777;2.将默认端口设置为8080
default.conf
1
2
3
4
5
6
7
8
9
10
11
12
| server{
listen 8080;
server_name _;
location /{
root /usr/share/nginx/html;
index index.html index.htm;
}
error_page 500 502 503 504 /50x.html;
location = /50x.html {
root /usr/share/nginx/html;
}
}
|
Dockerfile文件
1
2
3
4
5
6
7
8
| #Dockerfile
FROM docker.io/nginx:1.14
LABEL io.openshift.expose-services="8080:http"
COPY default.conf /etc/nginx/conf.d/default.conf
RUN chmod -R 777 /var/log/nginx /var/cache/nginx /var/run \
&& chgrp -R 0 /etc/nginx \
&& chmod -R g=u /etc/nginx
EXPOSE 8080
|
制作镜像
1
2
| docker build -t harbor.apps.example.com/public/nginx:1.14 .
docker push harbor.apps.example.com/public/nginx:1.14
|
使用新的镜像部署应用(在nginx-project中创建DeploymentConfig nginx-demo)
1
| oc new-app harbor.apps.example.com/public/nginx:1.14 --allow-missing-images --name=nginx-demo -n nginx-project
|
创建Service对应pod的8080端口
1
| oc expose dc nginx-demo --port=8080
|
创建Route对应Service,使得服务能够对外提供服务
1
| oc expose svc nginx-demo --hostname=www.web.example.com
|
本地绑定hostnamewww.web.example.com与Openshift集群的Router所在主机的ip,即可通过浏览器访问到服务。
2.自定义nginx配置
解决办法:使用ConfigMap创建nginx的配置,并挂载到/etc/nginx/conf.d目录
ConfigMap文件
1
2
3
4
5
6
7
| apiVersion: v1
kind: ConfigMap
metadata:
name: nginx-config
namespace: nginx-project
data:
demo.conf: "proxy_set_header Host $host;\r\nproxy_set_header X-Real-IP $remote_addr;\r\nproxy_set_header X-Forwarded-Server $host;\r\nserver {\r\n listen 8080;\r\n server_name _;\r\n \tlocation / {\r\n \tproxy_pass http://test.back.svc:28080/; \r\n \t}error_page 500 502 503 504 /50x.html;\r\n location = /50x.html {\r\n root html;\r\n }\r\n }"
|
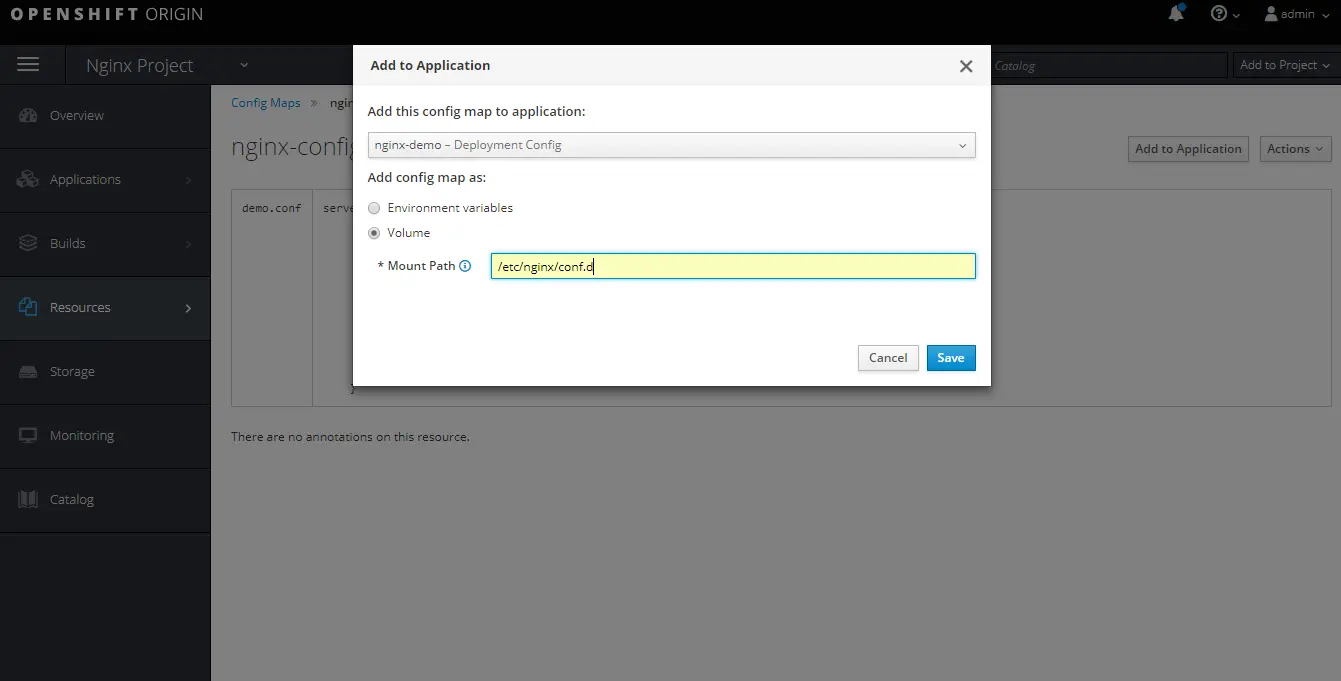
ConfigMap的内容即为nginx的conf.d目录下的所有conf配置文件。将它们挂载到/etc/nginx/conf.d目录下。
通过openshift的web console可以非常方便地操作如下图

当然我们也可以更改DeployConfig的配置来实现同样的效果
在nginx-demo的DeployConfig中添加挂载点及ConfigMap挂载
我们可以把所有配置一次性挂载到目录下
1
2
3
4
5
6
7
8
9
10
11
12
13
14
15
16
| ...
spec:
containers:
- image: 'harbor.apps.example.com/public/nginx:1.14'
imagePullPolicy: IfNotPresent
name: nginx-demo
volumeMounts:
- mountPath: /etc/nginx/conf.d
name: nginx-config-hgj4i
readOnly: true
volumes:
- configMap:
defaultMode: 420
name: nginx-config
name: nginx-config-hgj4i
...
|
同时我们也可以只挂载指定的文件,同时不覆盖同目录下的其他文件
1
2
3
4
5
6
7
8
9
10
11
12
13
14
15
16
17
18
19
20
| ...
spec:
containers:
- image: 'harbor.apps.example.com/public/nginx:1.14'
imagePullPolicy: IfNotPresent
name: nginx-demo
volumeMounts:
- mountPath: /etc/nginx/conf.d/test.conf
name: nginx-config-hgj4i
subPath: test.conf
readOnly: true
volumes:
- configMap:
defaultMode: 420
name: nginx-config
items:
- key: default.conf
path: test.conf
name: nginx-config-hgj4i
...
|
对于不同的应用,我们需要不同的nginx配置时,只需要挂载不同的configmap即可。常见的应用场景为:将nginx作为代理服务器来使用的情况。
3.应用代码更新
解决办法:持久化存储
Openshift是建立在Kubernetes的基础上的,而K8S支持十多种存储方式,如:NFS,GlusterFS,CephFS,RBD,HostPath等。
这里使用NFS作为持久化存储方案。CentOS系统自带NFS服务。
1
2
3
4
5
6
7
8
9
10
11
12
13
14
15
| systemctl start nfs #启动nfs,如果已启动,则不用操作
mkdir -p /nfsdata/nginx_app
chown nfsnobody:nfsnobody /nfsdata/nginx_app
chmod 700 /nfsdata/nginx_app
#开放nfs访问的端口
iptables -A INPUT -p tcp --dport 111 -j ACCEPT
iptables -A INPUT -p udp --dport 111 -j ACCEPT
iptables -A INPUT -p tcp --dport 2049 -j ACCEPT
iptables -A INPUT -p udp --dport 2049 -j ACCEPT
# 配置NFS
echo "/nfsdata/nginx_app *(rw,async,no_root_squash)" >> /etc/exports
exportfs -a #加载共享目录配置
showmount -e #查看当前可用的共享目录
|
创建PV持久化存储
1
2
3
4
5
6
7
8
9
10
11
12
13
| # nginx-pv.yml
kind: PersistentVolume
apiVersion: v1
metadata:
name: nginx-pv
spec:
capacity:
storage: "5Gi"
accessModes:
- "ReadWriteMany"
nfs:
path: "/nfsdata/nginx_app"
server: "192.168.0.4"
|
创建PV
1
| oc create -f nginx-pv.yml
|
创建PVC
1
2
3
4
5
6
7
8
9
10
11
| kind: PersistentVolumeClaim
apiVersion: v1
metadata:
name: nginx-app-pvc
namespace: nginx-project
spec:
accessModes:
- ReadWriteMany
resources:
requests:
storage: "5Gi"
|
将创建的PVC挂载到DeploymentConfig中需要放的应用的目录下,同时注意该目录也应该是与ConfigMap中的server的root目录一致。
1
2
3
4
5
6
7
8
9
10
11
12
13
14
15
16
17
18
19
20
| spec:
containers:
- image: 'harbor.apps.example.com/public/nginx:1.14'
imagePullPolicy: IfNotPresent
name: nginx-demo
volumeMounts:
- mountPath: /etc/nginx/conf.d
name: nginx-config-hgj4i
readOnly: true
- mountPath: /appdata
name: appdata-pvc
volumes:
- name: nginx-config-hgj4i
configMap:
defaultMode: 420
name: nginx-config
- name: appdata-pvc
persistentVolumeClaim:
claimName: nginx-app-pvc
|
将对应的NFS挂载到开发或者部署的服务器上,同时将代码拷入共享存储,此时代码自动同步到的应用中。实现了代码同步。
综上,我们实现了使用同一个Nginx镜像,实现了在Openshift上自定义nginx配置及应用代码的部署。


